This is part three in my series about creating serverless systems using AWS API Gateway + Lambda via the Serverless project. If you’re haven’t already you can read part I and part II.
My goal is to continue evolving this example to walk through a non-trivial example of doing something with the serverless architecture. Along the way I’ll demo some useful features which you’ll undoubtedly run into when doing real development with Serverless.
I’ll be covering two topics in this post:
- API Gateway Stages
- Managing configuration with variables
API Gateway Stages
If you’re new to API Gateway and Lambda an obvious question you may ask is, “How do I setup different deployments for my Serverless system?” Coming from a traditional setup most everyone will spin up different stacks/servers for their QA, Staging and Production environments. However, with a serverless project, how to you go about the same thing?
The answer to this are API Gateway stages. You can read the docs but I’ll try to distill down the big concepts…it’s not that complicated to grok.
With Gateway, a Stage is analogous to an “environment” if you’re running your own system. For example, in a given AWS account you may want to run and manage your Serverless project as one unit but manage your QA and Production environments separately. Of course, any new code or configuration changes you would first deploy to your QA Stage. Once you were confident things were working you’d then roll out those same changes to your Production Stage. Again, the analogy here is that you’re deploying code to different and separate systems. Another scenario is multiple developers working on the same project…each developer could have their own stage which would eliminate stepping on each other while doing development. API Gateway gives us this ability (and more) via Stages.
By default, you’ll get a dev stage when setting up a new Serverless project. Let’s create a new
stage which we’ll call production.
Remember, I’m using a Docker container to execute all of my Serverless commands. You can follow along by checking out the repository.
brianz@gold(master=)$ make shell
docker run --rm -it \
        -v `pwd`:/code \
        --name=slsdemo "bz/serverless" bash
root@8941047f877c:/code#
root@7c84db71d474:/code/serverless-demo$ sls stage create
Serverless: Enter a new stage name for this project:  (dev) production
Serverless: For the "production" stage, do you want to use an existing Amazon Web Services profile
or create a new one?
  > Existing Profile
    Create A New Profile
Serverless: Select a profile for your project:
  > default
Serverless: Creating stage "production"...
Serverless: Select a new region for your stage:
    us-east-1
  > us-west-2
    eu-west-1
    eu-central-1
    ap-northeast-1
Serverless: Creating region "us-west-2" in stage "production"...
Serverless: Deploying resources to stage "production" in region "us-west-2" via Cloudformation (~3 minutes)...
Serverless: Successfully deployed "production" resources to "us-west-2"
Serverless: Successfully created region "us-west-2" within stage "production"
Serverless: Successfully created stage "production"
Great! Remembering back, creating this new stage is akin to creating a new project. We don’t
actually have anything behind the scenes…we just have scaffolding in place so that we can deploy
some stuff. So, let’s deploy our existing hello function and endpoint:
root@7c84db71d474:/code/serverless-demo$ sls dash deploy
Serverless: Select the assets you wish to deploy:
    hello
      > function - hello
      > endpoint - hello - GET
    - - - - -
  > Deploy
    Cancel

Serverless: Choose a Stage:
    1) dev
  > 2) production
Serverless: Deploying the specified functions in "production" to the following regions: us-west-2
Serverless: ------------------------
Serverless: Successfully deployed the following functions in "production" to the following regions:
Serverless: us-west-2 ------------------------
Serverless:   hello (serverless-demo-hello):
arn:aws:lambda:us-west-2:123874195435:function:serverless-demo-hello:production

Serverless: Deploying endpoints in "production" to the following regions: us-west-2
Serverless: Successfully deployed endpoints in "production" to the following regions:
Serverless: us-west-2 ------------------------
Serverless:   GET - hello - https://4m98c4l3i1.execute-api.us-west-2.amazonaws.com/production/hello
Above, note that I’m deploying to the production stage. Down below Serverless spit out a new URL
which we can use to hit.
Behind the scenes, what is actually happening is that Serverless is instruction API Gateway and
Lambda to do several things…one of which is creating new versions of your Lambda function. Once
the new Lambda version is available, API Gateway will be pointed to that new version via a Lambda
Alias. API Gateway has a notion of a Stage Variable. As an example, our production stage will
have a Stage Variable of functionAlias = production. That means that this stage will point to
the production alias of our lambda function.
It’s quite interesting how it’s all orchestrated and I’d recommend reading the Serverless docs and playing around to see for yourself what changes in the AWS console as you deploy code.
Managing configuration with variables
Now that we have two different stages let’s show that they are indeed separated and can be controlled independently. What we’ll do is actually print out the name of the stage from our Lambda function. This is really easy to do thanks to Serverless variables. These are settings which can be unique for a given deployment…think about a database username, an API key for a 3rd party system, etc. When rolling out different versions of your code you’ll inevitably require each one to use specific settings.
Crack open s-function.json and grep for environment…you’ll see that Serverless is referencing
three different environment variables:
  "environment": {
    "SERVERLESS_PROJECT": "${project}",
    "SERVERLESS_STAGE": "${stage}",
    "SERVERLESS_REGION": "${region}"
  },
These are simple key/value pairs which Serverless will send over to Lamda when doing a
deployment. Here, the “values” are being referenced by some magic serverless variables with the
${thing} syntax. What is actually populating the values? The answer lies in the _meta
directory:
brianz@gold(master=)$ ls -l
total 40
-rw-r--r--  1 brianz  staff   34 Jun  2 15:22 s-variables-common.json
-rw-r--r--  1 brianz  staff  220 Jun  2 15:22 s-variables-dev-uswest2.json
-rw-r--r--  1 brianz  staff   50 Jun  2 15:22 s-variables-dev.json
-rw-r--r--  1 brianz  staff  234 Jun  2 15:27 s-variables-production-uswest2.json
-rw-r--r--  1 brianz  staff   27 Jun  2 15:25 s-variables-production.json
You can see here that for each stage we have two different files. The files with the region name
contains some meta data about our deployments…for now, we’re more interested in the
s-variables-production.json file.
brianz@gold(master=)$ grep stage *
s-variables-dev.json:  "stage": "dev",
s-variables-production.json:  "stage": "production"
So, the stage variable is automatically set in these files.
Now, you may think that these variables are being set and uploaded to AWS somewhere via Stage Variables or the like. I definitely thought that…but I was wrong. Environment variables which you define and use in Serverless like this are actually injected into your Lambda handler upon deployment. You can read all about it in the Serverless docs. The key is this single bullet point:
Your regular handler file is replaced by one that Serverless adds titled _serverless_handler, which contains your Function’s Environment Variables in-lined in the code.
Serverless actually gives us a new Lambda handler with the environment variables injected to
os.environ before calling our Python handler.
.Getting access to the values is quite easy…it’s just the stock Python way of getting stuff from
the environment Here’s the change we’ll make to get the stage name and return it in the HTML message:
def handler(event, context):
    value = os.environ.get('SERVERLESS_STAGE', '')
    return """<html>
    <head></head>
    <body>
        <h1>Hello from Serverless/API Gateway/Lambda</h1>
        <h2>SERVERLESS_STAGE: %s</h2>
        <h2>Event:</h2>
        <pre>
            %s
        </pre>
        </body>
    </html>""" % (value, json.dumps(event), )
Once that’s done I’ll sls dash deploy for the dev and production stages…low and behold,
when I hit the two endpoint I get what I expect:


I think it’s interesting to look behind the scenes to see how this actually happened. When you download the zip file containing your code which backs your lambda function you’ll see what your rewritten handler actually looks like:
brianz@gold(master=)$ cat ~/Desktop/serverless-demo-hello-5b5a957b-4073-43fd-8b76-d315422fd269/_serverless_handler.py import os, sys
os.environ['SERVERLESS_PROJECT'] = str('serverless-demo')
os.environ['SERVERLESS_STAGE'] = str('dev')
os.environ['SERVERLESS_REGION'] = str('us-west-2')
os.environ['SERVERLESS_DATA_MODEL_STAGE'] = str('dev')
here = os.path.dirname(os.path.realpath(__file__))
sys.path.append(here)Great…we now know how to access environment variables and control deployments via stages. Let’s do the work of adding some configuration of our own!
I’m going to add another reference in handler.py to a new variable:
magic = os.environ.get('MAGIC_VARIABLE', '')The other small change is simply putting it in the HTML output string. I also will need to inject
this variable into the lambda function by adding it to s-function.json
  "environment": {
    "MAGIC_VARIABLE": "${magicVariable}",
    // existing vars
The final step is setting these variable. Note here, we have a single change to
s-function.json…it’s getting the actual value for MAGIC_VARIABLE from the Serverless
framework. We can control the value of ${magicVariable} by hooking into Serverless
configuration/variable files. I’m going to add two different values…one for each of our two
deployments. Open up s-variables-production.json and s-variables-dev.json. The dev version
turns into this:
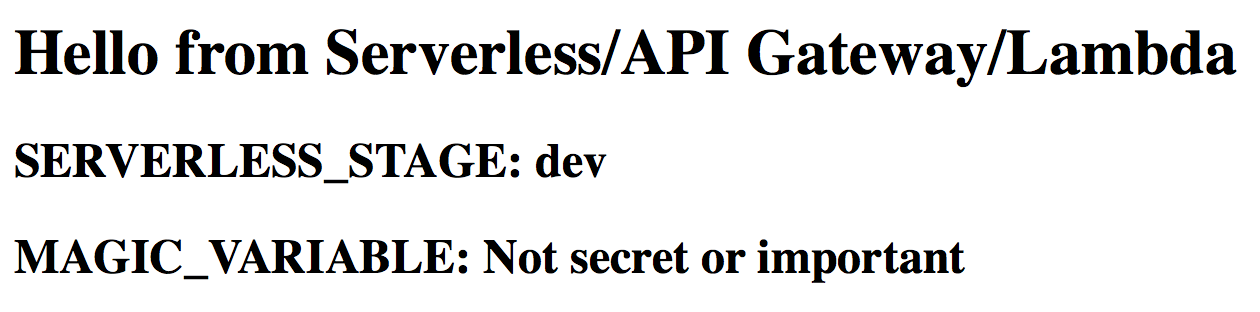
{
"magicVariable": "Not secret or important",
"stage": "dev"
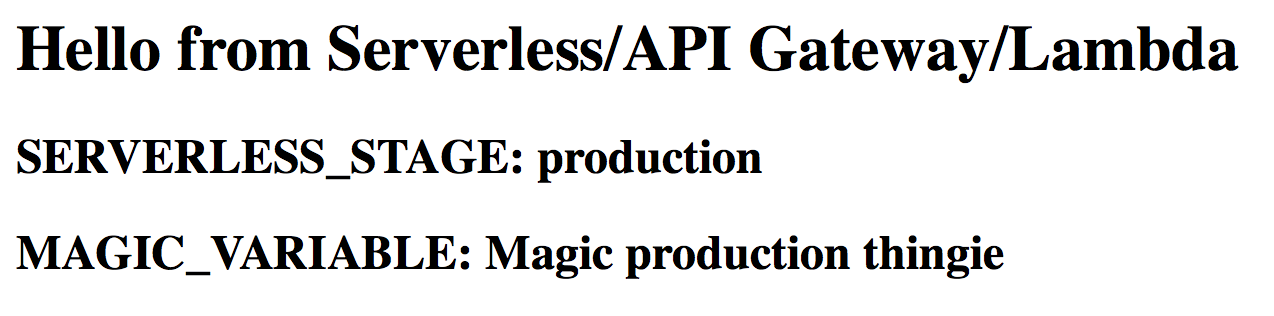
}The production file has the same variable but of course with a different value. Now let’s deploy both of these and see what we get:
dev
…and, production
Conclusion
We now know how to create different deployments and control them independently. I also explained some of the voodoo going on behind the scenes. In Part IV I’ll cover some other features in the Serverless ecosystem which allows for easier collaboration and syncing of sensitive data. Hopefully, we can also start building out a more interesting demo which actually does something.