NOTE!!!
As of March 2017 this post is no longer relevant. AWS has updated API Gateway so that you can get a free certificate using AWS Certificate Manager. I’m leaving this up for historical purposes but if you need SSL for API Gateway on your own domain please have a look at the Certificate Manager integration…it’s quite easy!
If you’re reading this blog it will become very obvious I’m a big fan of the Serverless framework to power AWS Lambda and API Gateway integration.
When building real APIs that you’d like to deploy publicly one thing you’ll run into eventually is that of setting up a custom domain name. API Gateway is fantastic and you can get up and running in a hurry, exposing a publicly facing API running over SSL. However, the chances of you actually wanting to use the AWS-provided URL is slim to nil. Do you really want to publish a public API with the format of:
https://abcxszhmwi.execute-api.us-west-2.amazonaws.com/dev
No. You don’t.
In this post I’ll use my Dilbert Slack plugin which I built
in a prior post (and which I’m still running on a few different Slack channels). What we’ll do is
set up a custom domain with SSL so that https://dilbert.brianz.bz works just the same as the
default API Gateway URL.
What is even better…we’ll do this for FREE using a completely legitimate certificate authority so that our certs don’t raise any warnings for users. Because we’re going to be doing this with open source software there are a few hoops to jump through…but not that many. If you feel like shelling out a few hundred dollars to buy a domain from a certificate authority the process would be super simple…but that’s no fun. This process is simple enough that I don’t know why anyone shells out the money for an SSL cert these days (unless you need a wildcard domain…more about that in at the end of this post).
Overview
Here is the overall process we’ll use. First, the tools which I use to accomplish this:
- Docker (not required, but handy)
certbot- DNS zone file
The secret sauce in getting a free SSL certificate is certbot from the Electric Frontier
Foundation.
And the steps which I’ll cover in detail:
- Spin up Docker container using
python:2image - Install
certbotin container - Run
certbotin container - Change DNS records as instructed by
certbotto verify domain - Create a “Custom Domain” in API Gateway and Install certificate files
- Update your DNS records to point to your new Cloudfront distribution
To be clear, there are definitely other ways to accomplish this. This is actually my second
iteration of this process which is easier than my first implementation.
For my purposes I’ve found this process to be quite easy and painless. One caveat with certbot
certificates is that they expire after only three months. This process is so simple I don’t think
it’s a big deal to do it four times a year. Sure…if you’re managing dozens of domains it could
get cumbersome, but for a handful of domains it’s not a huge deal.
Getting started
certbot has many different options and methods for validating that you own the domain for which you’re
requesting a domain. I have found that the easiest validation method is via DNS. Other challenge
methods require running an HTTP server on some publicly accessible host. This used to be the
method I used where I’d spin up a nano EC2 instance, run a simple HTTPServer via Python and have
it serve a some file in response to the HTTP request from certbot. The DNS challenge is much
simpler…all it requires is adding an TXT record without the need to run any additional systems
or software.
I’m using Docker for all this since it’s so easy. certbot is installable via pip, however
there are several system dependencies you’ll need. Because it’s so easy with Docker it’s my
suggested method for using certbot. Here’s a two line Dockerfile which will work:
FROM python:2
RUN pip install certbot
It’s really that easy.
My accompanying Makefile:
NAME="bz/certbot"

.PHONY: all shell

all :
	docker build -t $(NAME) .

shell :
	docker run --rm -it \
		-v `pwd`/letsencrypt:/etc/letsencrypt \
		$(NAME) bash
So now I’ll just:
$ make
$ # lots of output
Removing intermediate container 71cb0a9bbfb9
Successfully built f93119d079ac
$ mkdir letsencrypt
$ make shell
docker run --rm -it \
                -v `pwd`/letsencrypt:/etc/letsencrypt \
                "bz/certbot" bash
root@ff55a6336d39:/#Note: Here I’m creating a local directory names letsencrypt and mounting in into the
container as /etc/letsencrypt. The reason for that is because certbot will place all of the
created certificates into /etc/letsencrypt. We want any created files to persist on our local
system after the container has been removed.
Creating the certificate
certbot has tight integration with Nginx, Apache and other webservers. However, I have found these to be more
trouble than they are worth since they will actually attempt to write over your config files or
expect your webserver to be able to serve static content from a path which looks like
/.well-known/acme-challenge/fhKqLc6FuM97zg3.
What I have found to be super easy is the --manual method which we’ll use here.
In the docker container:
# certbot certonly --manual -d dilbert.brianz.bz --preferred-challenge dns
What this is saying is:
certonly→ Only get a certificate…don’t try to install it for me--manual→ Use the interactive mode with prompts-d→ Request a cert for the domaindilbert.brianz.bz--preferred-challenges→ Use DNS for validation rather than a web server
Here is the full output from my run:
root@271530c5cbad:/certs# certbot certonly --manual -d dilbert.brianz.bz --preferred-challenges dns
Saving debug log to /var/log/letsencrypt/letsencrypt.log
Obtaining a new certificate
Performing the following challenges:
dns-01 challenge for dilbert.brianz.bz

-------------------------------------------------------------------------------
NOTE: The IP of this machine will be publicly logged as having requested this
certificate. If you're running certbot in manual mode on a machine that is not
your server, please ensure you're okay with that.

Are you OK with your IP being logged?
-------------------------------------------------------------------------------
(Y)es/(N)o: Y

-------------------------------------------------------------------------------
Please deploy a DNS TXT record under the name
_acme-challenge.dilbert.brianz.bz with the following value:

tBkgiRMxuIGSKH-WzJiJMTCi5uuEsZUUJJmg8FIBZ40

Once this is deployed,
-------------------------------------------------------------------------------
Press Enter to Continue
Waiting for verification...
Create TXT record
This part is easy enough. Simply add a TXT record in your DNS zone file as instructed. I’m using
Route53 and this is what it looks like:
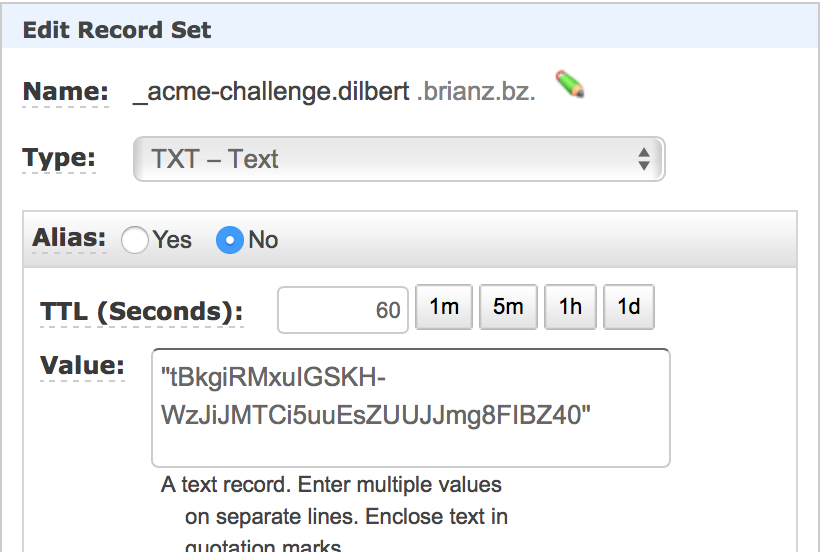
It may take a bit for this record to propagate. You can check that it’s returning the correct value
using dig:
$ dig -t TXT _acme-challenge.dilbert.brianz.bzFinishing off challenge
Once your TXT record is working, simply hit enter back in the certbot prompt:
Cleaning up challenges
Generating key (2048 bits): /etc/letsencrypt/keys/0000_key-certbot.pem
Creating CSR: /etc/letsencrypt/csr/0000_csr-certbot.pem

IMPORTANT NOTES:
 - Congratulations! Your certificate and chain have been saved at
   /etc/letsencrypt/live/dilbert.brianz.bz/fullchain.pem. Your cert will
   expire on 2017-05-18. To obtain a new or tweaked version of this
   certificate in the future, simply run certbot again. To
   non-interactively renew *all* of your certificates, run "certbot
   renew"
 - If you like Certbot, please consider supporting our work by:

   Donating to ISRG / Let's Encrypt:   https://letsencrypt.org/donate
   Donating to EFF:                    https://eff.org/donate-le
Nice! Again, you’ll notice that certbot put the keys in /etc/letsencrypt. If you’re using
Docker like I am these will now be sitting on your host system. It’s now safe to kill the
container.
There are four certificate files created:
$ pwd
/Users/brianz/dev/certbot/letsencrypt/live/dilbert.brianz.bz
$ ls -l
-rw-r--r--  1 brianz  staff  543 Feb 16 16:56 README
lrwxr-xr-x  1 brianz  staff   38 Feb 16 16:56 cert.pem -> ../../archive/dilbert.brianz.bz/cert1.pem
lrwxr-xr-x  1 brianz  staff   39 Feb 16 16:56 chain.pem -> ../../archive/dilbert.brianz.bz/chain1.pem
lrwxr-xr-x  1 brianz  staff   43 Feb 16 16:56 fullchain.pem -> ../../archive/dilbert.brianz.bz/fullchain1.pem
lrwxr-xr-x  1 brianz  staff   41 Feb 16 16:56 privkey.pem -> ../../archive/dilbert.brianz.bz/privkey1.pem
Setting up custom domain with API Gateway
Now that we have our certificate files, it’s time to set up a custom domain in API Gateway. How this will work is the following:
- Create a custom domain in API Gateway and upload certificate files
- Point the new custom domain at the desired API
- Wait for Cloudfront distribution to complete
First up, navigate to the API Gateway console and click on “Custom Domain Names” followed by the “Create” button.
Now, you’ll need to copy and paste the correct files into the correct locations. The mapping
between certbot certificate files and API Gateway Custom Domain form fields is the following:
cert.pem→ Certificate bodyprivkey.pem→ Certificate private keychain.pem→ Certificate chain
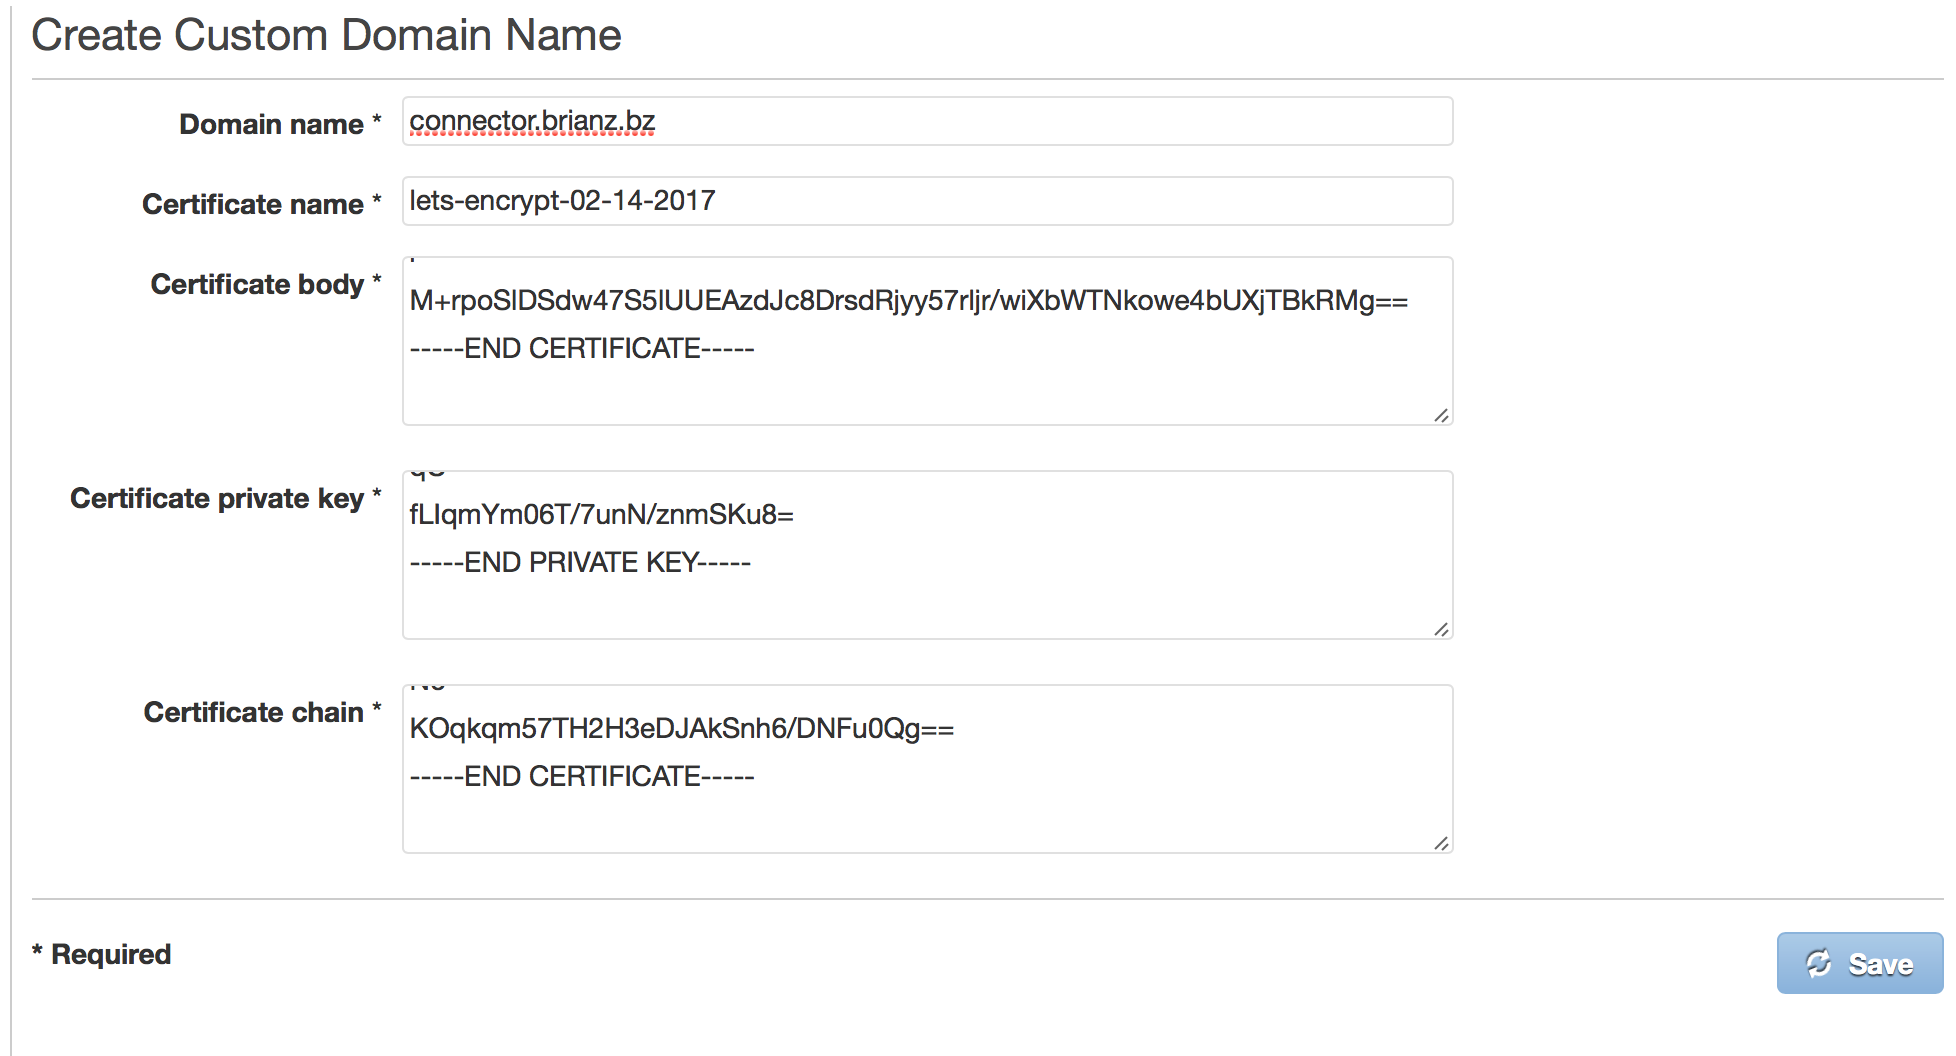
Note, this screen-shot is from when I set up a different Custom Domain Name mapping
Once you’ve clicked the Save button it’s time to point this domain at a particular API and stage.
For this example it’s going to be easy…I’ll point the root domain (i.e., dilbert.brianz.bz) at
my single dev stage for my API. Click “Create API mapping” an put in:
- Base path → Leave blank
- API → Select your desired API distribution
- State → Select your desired stage

If you have a more complicated setup, you could do something like the following:
- point
dilbert.brianz.bz/api/devto thedevstage ordilbert-devServerless service. - point
dilbert.brianz.bz/api/qato theqastage ordilbert-qaServerless service. - point
dilbert.brianz.bz/api/to theproductionstage ordilbert-productionservice.
You get the idea…this is a way to create different environments by pointing URLs at completely different systems.
Once that is done, you’ll be greeted with the following:
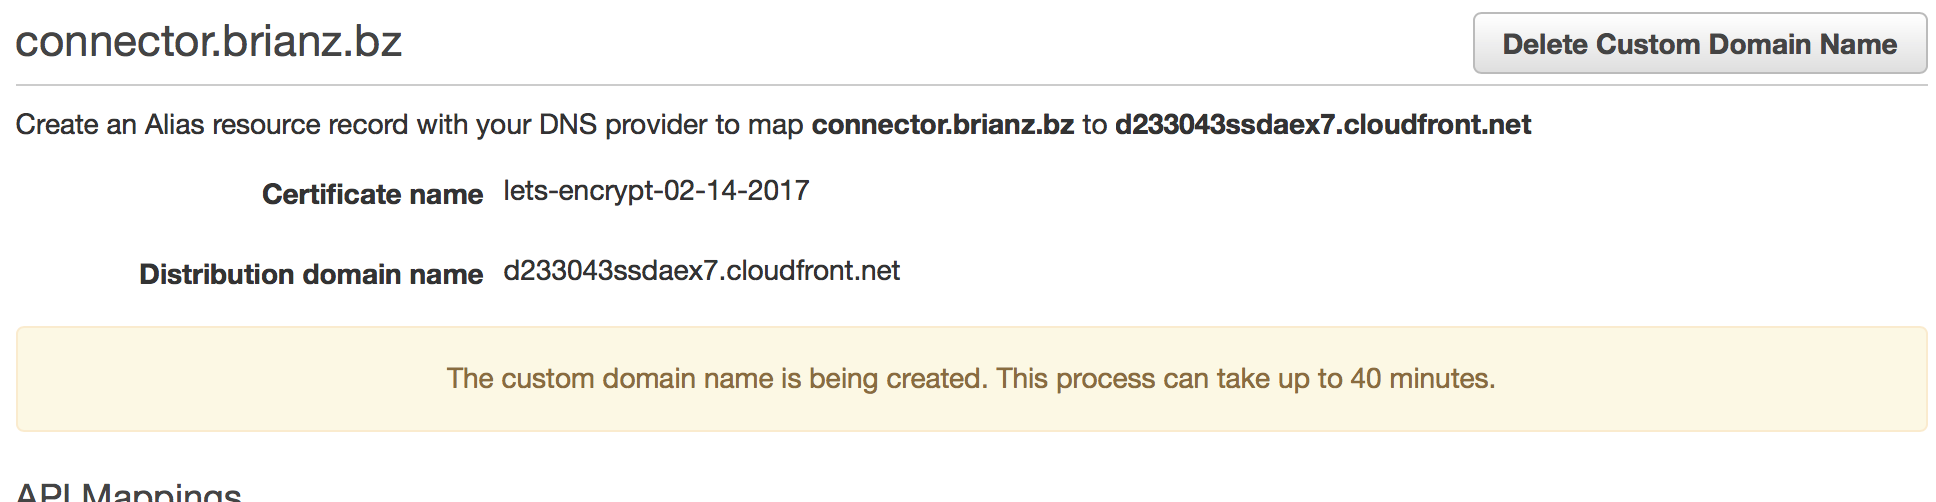
Again, note this screen-shot is from when I set up a different Custom Domain Name mapping
This process really can take a long time. While the message states “Up to 40 minutes” I’ve experienced wait times of several hours.
Point DNS at Cloudfront
While you’re waiting on that to finishing there’s one final thing to do: add a CNAME record in
your DNS zone file to point your public subdomain (dilbert.brianz.bz in this example) to the
Cloudfront URL created on your behalf.
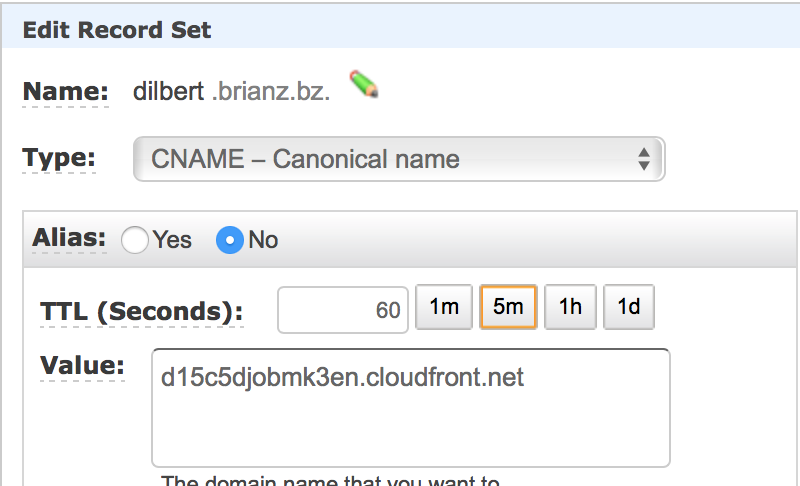
Note, your DNS will likely propagate faster than the Cloudfront distribution takes to actually set up.
After the wait is over and the Cloudfront distribution is created, we now have a perfectly valid SSL certificate which I can use for my API. Hitting https://dilbert.brianz.bz from Slack works as expected.
Summary
certbot is a great tool to create perfectly valid and completely free ssl certificates. Creating
these certs with the --manual method and the dns validation method is a simple way to get certs
for use with API Gateway’s Custom Domain Name feature. Since these certs expire every three months
you’ll need to renew a bit more often than with a paid SSL certificate, however the process isn’t
that complicated and in my book the extra work is worth the price savings.
Finally, I should note that certbot does not work with wildcard domains. If you have several
subdomains you need certs for your only choice is to shell out the money for a wildcard domain from
one of the commercial CAs.