Since my last posts on Serverless, Serverless has gone 1.0. In fact, as of this writing Serverless is at version 1.3. I’ve had the luck of taking 1.3 for a spin with my new job by implementing an application for the Amazon Alexa platform. Alexa has a really nice integration with Lambda and we’ve been using Serverless to do our Lambda development. Our development pace has been insanely high and much of that can be attributed to Serverless.
The 1.x versions of Serverless is drastically different than the 0.x versions I previously wrote about. In fact, I believe it was a total or near-total rewrite of the library itself. With such a drastic change I’d like to do another walk-through starting from scratch and ending up with a working application. In addition to changes in the Serverless library comes with changes and huge improvements in API Gateway and Lambda themselves. The great news is that authoring a service with these tools is getting even easier.
Setup
To get started, I like to run Serverless inside of a Docker container Why? Because I ♥ Docker and it makes switching versions trivial without mucking with your local system. Since I use Python I usually install a few base Python packages while I’m at it:
Of course, before you get started you’ll need to have AWS credentials available which allow you to
create resources. If you do any amount of AWS work changes are you’ll have AWS_ACCESS_KEY_ID and
AWS_ACCESS_SECRET_KEY on your local system. What I do is simply copy these into a file called
.env
$ env | grep AWS >> .envNow, I can easily inject these into my Docker container using --env-file .env. If you are
running on your local system you’ll need to have these two AWS variables set. See the Serverless
docs on credentials for
more details on AWS credentials if you need it.
NOTE: Code snippets will be running inside my Docker container
Create a Serverless project
Let’s create a really simple Slack plugin. What we’ll do is create an HTTP API which will reply with a URL to a Dilbert comic. For example: http://dilbert.com/strip/2016-11-28
You can see that the date is embedded directly into the URL so it should be pretty easy to generate a URL for “today” or on a specific date. Let’s define our Slack Slash Command language as the following:
/dilbert→ Reply with today’s comic/dilbert random→ Reply with a random comic from the past year/dilbert yesterday→ Reply with yesterday’s comic/dilbert $N days ago→ Reply with a comic from$Ndays ago where$Ncan be numeric or plain English/dilbert $DATE→ Reply with a comic from a specific date with multiple formats
I’ll leave the Slack setup to you…but the long and short of it is that you’ll need to add a new “Slash Command” and plug in the API Gateway URL once we have it.
Now, on to the Serverless!
Let’s create a new project. As usual, we’ll be using Python to implement our application code:
$ serverless create --template aws-python --path dilbert --name dilbert
Serverless: Generating boilerplate...
Serverless: Generating boilerplate in "/code/dilbert"
 _______                             __
|   _   .-----.----.--.--.-----.----|  .-----.-----.-----.
|   |___|  -__|   _|  |  |  -__|   _|  |  -__|__ --|__ --|
|____   |_____|__|  \___/|_____|__| |__|_____|_____|_____|
|   |   |             The Serverless Application Framework
|       |                           serverless.com, v1.2.0
 -------'

Serverless: Successfully generated boilerplate for template: "aws-python"
Let’s cd dilbert and take a look at the files which were generated:
$ tree dilbert/
dilbert/
├── event.json
├── handler.py
└── serverless.yml
This is very similar to previous versions of Serverless and much different at the same time.
Previously we would have received a higher level s-project.json and s-resources-cf.json files.
Setup API Gateway
Crack open serverless.yml and you’ll see the details on how your function and endpoint(s) are
configured. First, let’s tune back the memory and timeout…we’re running a very small Lambda
function so we can tune these both back to some pretty small values.
service: dilbert

provider:
  name: aws
  runtime: python2.7
  stage: dev
  region: us-west-2
  memorySize: 256
  timeout: 6
In order to wire something up to our Lambda functions we use the functions block. What is nice
here is that we can now define multiple functions inside of a given “service”.
In prior Serverless versions a single function was a bit more self-contained and it was
hard or unclear how to define a “service” vs a “function”. Now, it’s much more clear…we have
created a Serverless “service” which can be made up of one or more “functions”, all sharing the
same resources (which we’ll get to later).
functions:
  hello:
    handler: handler.hello
It’s important to note here the handler is really just pointing to handler.py.
handler.hello then is just telling Serverless to setup a Lambda function which invokes the
hello function in your handler.py file.
For a Slash commands we want to setup an API endpoint which response to GET requests. Under the
same function block let’s add an HTTP GET event as a trigger to our Lambda function. Serverless
will pick this up and setup our API Gateway entry-point and wire it together with our Lambda
function/handler:
functions:
  hello:
    handler: handler.hello
    events:
     - http:
         path: /
         method: get
Again, quite simple. Serverless is going to take this and create an API Gateway endpoint which
responds to GET requests at the root.
Deployment
Now, let’s deploy this and watch Serverless work its magic:
root@ae95b29ae049:/code/dilbert$ sls deploy
Serverless: Packaging service...
Serverless: Uploading CloudFormation file to S3...
Serverless: Uploading service .zip file to S3 (2.19 KB)...
Serverless: Updating Stack...
Serverless: Checking Stack update progress...
........................
Serverless: Stack update finished...

Service Information
service: dilbert
stage: dev
region: us-west-2
api keys:
  None
endpoints:
  GET - https://cjkxszhmwi.execute-api.us-west-2.amazonaws.com/dev/
functions:
  dilbert-dev-hello: arn:aws:lambda:us-west-2:420819310858:function:dilbert-dev-hello
Great…let’s hit our endpoint:
$ curl -s ps://cjkxszhmwi.execute-api.us-west-2.amazonaws.com/dev/ | python -mjson.tool {
"input": {
"body": null,
"headers": {
"Accept": "*/*",
"CloudFront-Forwarded-Proto": "https",
"CloudFront-Is-Desktop-Viewer": "true",
"CloudFront-Is-Mobile-Viewer": "false",
"CloudFront-Is-SmartTV-Viewer": "false",
"CloudFront-Is-Tablet-Viewer": "false",
"CloudFront-Viewer-Country": "US",
"Host": "cjkxszhmwi.execute-api.us-west-2.amazonaws.com",
"User-Agent": "curl/7.43.0",
"Via": "1.1 d3faf01897d35b8f07de2d81452478f1.cloudfront.net (CloudFront)",
"X-Amz-Cf-Id": "yXNYMvCXFNa7Wc5DYIo5mBSd_DrzDFEll-2-b8dZN8qneqf4rnxX2A==",
"X-Forwarded-For": "174.29.177.16, 216.137.38.83",
"X-Forwarded-Port": "443",
"X-Forwarded-Proto": "https"
},
"httpMethod": "GET",
"isBase64Encoded": false,
"path": "/",
"pathParameters": null,
"queryStringParameters": null,
"requestContext": {
"accountId": "444444444444",
"apiId": "cjkxszhmwi",
"httpMethod": "GET",
"identity": {
"accessKey": null,
"accountId": null,
"apiKey": null,
"caller": null,
"cognitoAuthenticationProvider": null,
"cognitoAuthenticationType": null,
"cognitoIdentityId": null,
"cognitoIdentityPoolId": null,
"sourceIp": "174.29.177.16",
"user": null,
"userAgent": "curl/7.43.0",
"userArn": null
},
"requestId": "f5096723-b5de-11e6-abfe-bdf276cfb36a",
"resourceId": "96p3xs47w7",
"resourcePath": "/",
"stage": "dev"
},
"resource": "/",
"stageVariables": null
},
"message": "Go Serverless v1.0! Your function executed successfully!"
}
One really nice thing is a change to the Lambda/API Gateway integration from the AWS team. There
is something now called a “Lambda-Proxy” integration with Gateway. This makes the integration and
passing of data between Lambda and Gateway super simple. You should use it. Notice above there is a
field called queryStringParameters. Let’s make another request and send some GET arguments:
curl -s https://cjkxszhmwi.execute-api.us-west-2.amazonaws.com/dev/ -G --data-urlencode "date=two days ago" | python -mjson.tool
In the response, it should be no surprise that we get:
"queryStringParameters": {
    "date": "two days ago"
},
This is fantastic. Previously getting query parameters from Gateway into Lambda was quite tedious and much more complicated than it should have been. Now, we get this out of the box which is really what we should all expect.
Building our application
Now that we have the boilerplate (mostly) out of the way we can focus on our actual Dilbert application. I won’t cover the details of it, but instead show the finished product based on our little spec above for the Slash commands.
You can see the final results here: https://github.com/brianz/dilbert-slack-bot
Here are some highlights of how this is implemented.
For this project, let’s rename the function from hello to dilbert in serverless.yml:
functions:
  dilbert:
    handler: handler.dilbert
In our handler.py file we’ll now implement a function called dilbert which will accept the same
two parameters as the hello function, the http event/request and the request context. This
function will contain all of the logic to parse the request text from Slack and figure out what to
respond with. The details on how to do this are really details around Slack, not details about
Serverless. If you’re curious about the details you can simply read the handler.py
source.
In order to reply with a nice Slack message we’d like to embed the comic’s image in the Slack response. This requires parsing the dilbert.com page for a given day and extracting the image’s URL. For performance reason’s, it’d be nice to cache this value…so let’s put the image’s URL in DynamoDB!
Building arbitrary resources
Because Serverless uses CloudFormation to create your service it’s possible to create and manage arbitrary AWS resources such as DynamoDB. For our purposes, we’d like to create a DynamoDB table to cache image urls when we create our stack.
resources:
  Resources:
    dynamoUsersTable:
      Type: AWS::DynamoDB::Table
      Properties:
        TableName: devDilbert
        AttributeDefinitions:
          - AttributeName: postDay
            AttributeType: S
        KeySchema:
          - AttributeName: postDay
            KeyType: HASH
        ProvisionedThroughput:
          ReadCapacityUnits: 1
          WriteCapacityUnits: 1
This is very cool. During any sls deploy command Serverless will manage this DynamoDB table for
us, whether that be creating it on the initial sls deploy or updating it if we change any of its
attributes.
One “gotcha” with this is that we need an IAM policy so that our Lambda function (ie, our
application code in handler.py) has access. To add the IAM policy we put this block under our
provider block in serverless.yml:
provider:
  ...
  iamRoleStatements:
    - Effect: "Allow"
      Action:
        - "dynamodb:*"
      Resource: "arn:aws:dynamodb:${self:provider.region}:*:table/devDilbert"
Deploying and iterations
Once this is all setup we can now do another sls deploy. Serverless will set up our DynamoDB
table and update our Lambda function appropriately.
During development it’s very common to deploy your code, test it, find a bug and then redeploy. For me this cycle consists of the following (after the initial deployment):
- test
- look in AWS Cloudwatch for any errors or debugging output
- fix bugs
- redeploy just the function with
sls deploy function -f function-name
The redeployment goes much quicker if you only deploy the actual function/application code to
Lambda. A full sls deploy will manage the entire stack/service through Cloudformation which can
take a few seconds. On the other hand, sls deploy function -f dilbert will simply upload the
current version of handler.py and supporting files to Lambda. This takes just a few seconds at
most.
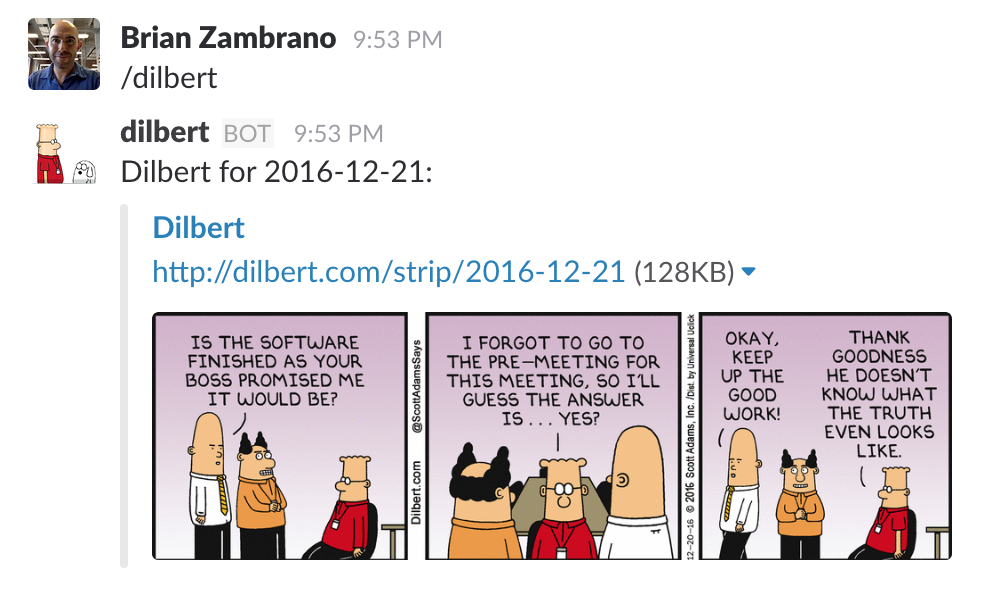
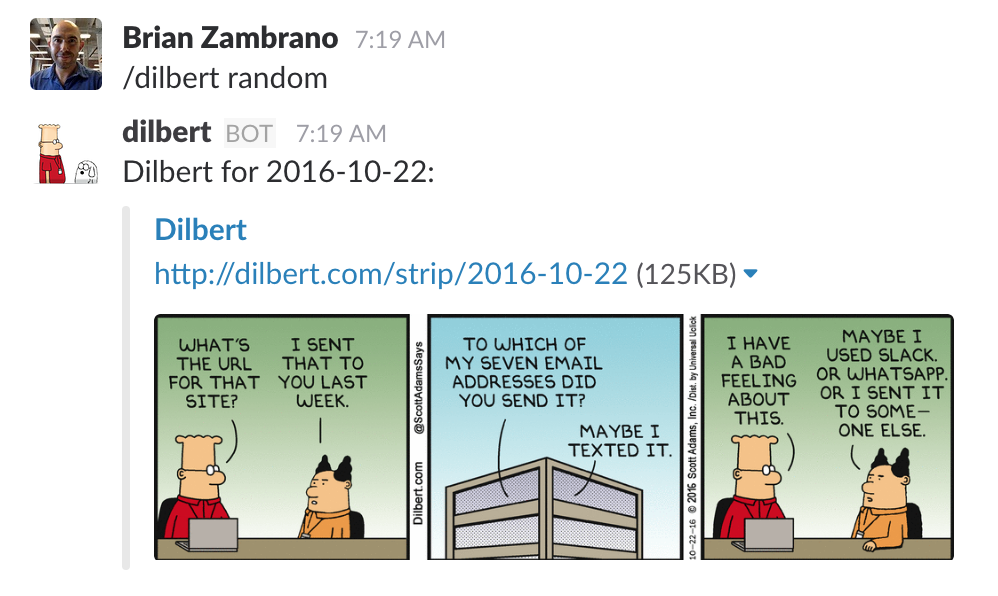
Results
After deployment and getting Slack configured here’s the end result:
Summary
Serverless 1.X is much improved over the 0.X versions. I have found it to be much easier to use especially when collaborating with other developers. The notion of a “service” makes a lot of sense and allows for better organization and sharing of resources. Finally, the ability to create and manage arbitrary AWS resources allows us to quickly and easily deploy a real stand-alone microservice.
This post didn’t talk at all about Serverless “stages”, but using “stages” in effect let’s us manage different stacks for “production”, “dev”, “staging”, etc. This is the equivalent of having a staging server vs production server in a typical web application deployment.
Serverless continues to make huge strides forward and I’ve already been able to move quickly on a few different projects. I’m excited to see what’s coming next in Serverless to make application and microservice development even easier.